How to Draw a Car in Perspective

In this lesson, we will show you how to draw a car in perspective using all the techniques available to an artist to create a three-dimensional effect.
Among the methods available to an artist for creating a convincing sense of volume in the drawing of any object, one of the most important is linear perspective. This principle means that objects, or parts of objects, appear smaller as they move farther away from the viewer and larger as they move closer.
Another important principle for conveying volume is atmospheric perspective. According to this principle, objects that are farther away appear less contrasty and less clearly defined, while objects that are closer to the viewer appear sharper and more detailed.
It is these two principles that we will use to draw a car in perspective, supplementing them with light shadows and the correct distribution of detail in the drawing.
This lesson is fully based on our main car drawing tutorial, but it includes much more pronounced perspective, a stronger emphasis on volume, and the use of visual foreshortening.
How to draw a car in perspective step by step
Step 1: Sketch the basic shape of the car
To draw a car in perspective, you first need to sketch its basic outlines of the body. Use light lines to draw the boundaries of the body, marking the hood, roof, trunk, and other important general parts. Notice how the volume of the car visually decreases as it moves farther away from us.

Step 2: Sketch the headlights and front grille
Starting from this step, add the largest forms that lie on the main mass of the car. Begin with the front plane by marking the outlines of the headlights and the radiator grille. These details should lie on the same plane as the front bumper and compress in the distant part according to the rules of linear perspective.

Step 3: Mark the wheel arches and windows
Now sketch the wheel arches, also keeping in mind the principles of linear perspective and the fact that the far wheel arch should be slightly smaller than the near one. Then mark the outlines of the windshield and the side window frame, which should also gradually decrease toward the rear part of the car.

Step 4: Sketch the bumper, wheels, and mirror
In the front part, form the outline of the bumper with the air intakes using lightly drawn, easily erasable lines. Sketch the wheels inside the arches, making the front wheel slightly larger than the rear one. At the front part of the window frame, mark the side mirror, and a little farther back indicate the central pillar.

Step 5: Mark the outlines of the rims
Give the front elements more volume while still trying not to use overly dark final lines, so that it will be easier to erase them later if needed. Indicate the outlines of the rims and check the proportionality and how the parts of the drawing relate to each other, as well as their consistency with the rules of linear perspective.

Step 6: Sketch the doors and wheel rims
On the side surface of the car, draw the doors and make sure they decrease in size according to perspective. Inside the outlines of the rims, mark the hubs in the central part. Then from them sketch the outlines of the spokes of the rims extending outward. Make sure that all these details not only follow the rules of linear perspective but also sit correctly on the side plane of the car.

Step 7: Refine the headlights and front grille
The front part of the car is closest to us, which means it should be the most detailed and the most contrasted. Outline the contours of the headlights and the front radiator grille with darker lines. Here it is also important to maintain linear perspective and make the far side of the front surface of the car slightly smaller than the near side.

Step 8: Draw the car bumper and air intakes
In the same way, carefully and clearly draw the outline of the bumper with the air intakes located below the headlights. Make sure that this part lies on the same plane as the headlights and the radiator grille, and that it also slightly decreases in perspective.

Step 9: Trace the roof and window frame
Carefully draw the outline of the car roof, which smoothly flows into the rear part and slightly decreases in perspective. In the same way, draw the window frame, which lies on the side plane and also becomes slightly smaller as it moves farther away.

Step 10: Refine the side surface of the car
Detail the side surface of the car by outlining the wheel arches and adding the door seams. Here you can already begin applying the principles of atmospheric perspective by making the parts of the car that are farther away slightly lighter than those that are closer.

Step 11: Refine the car wheels and rims
With smooth movements, draw the outlines of the wheels and rims in greater detail, keeping the principles of linear and atmospheric perspective in mind. Also try to convey the principle of overlap by drawing the wheels inside the arches so that the body covers parts of the tires, showing the volume of the entire composition.

Step 12: Draw the spokes of the car rims
Carefully outline the hubs and begin drawing the spokes that radiate evenly from the center toward the edges. Here you can again convey atmospheric perspective by drawing the rear spokes less detailed and less contrasted than the front ones.

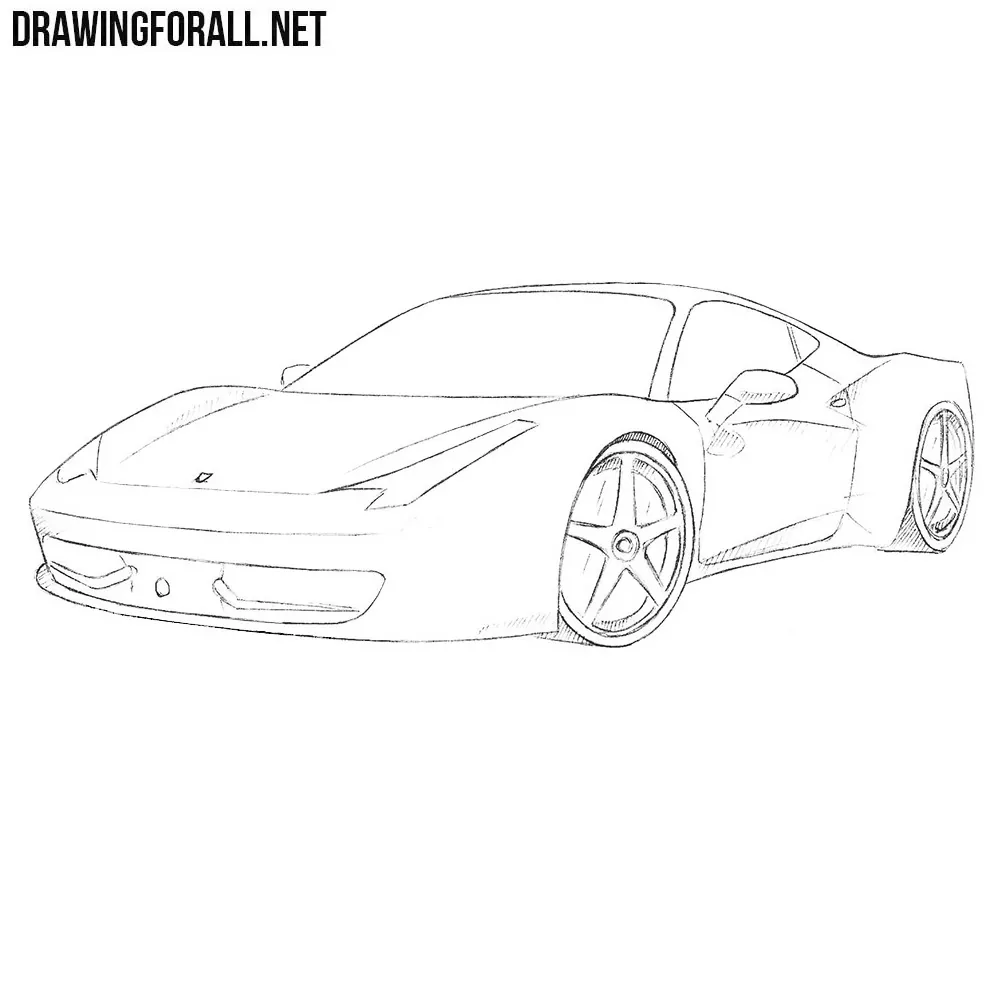
Step 13: Finish the car drawing with shading
Slightly darken the front part of the car to create a stronger sense of atmospheric perspective. Begin adding hatching as well, keeping this principle in mind and making them more contrasted and defined in the front part than in the rear. If the rear part of the car appears not soft or light enough, you can use an eraser or a kneaded eraser to reduce the contrast and further emphasize the atmospheric perspective. Add a shadow beneath the car to create an even stronger sense of three-dimensionality in your composition.

If you have completed drawing the car in perspective, it is time to consolidate your knowledge and take it to the next level.
First, try adding more complex shadows to give your car drawing an even more volumetric appearance. Shadows, along with the principles of linear and atmospheric perspective as well as the basics of overlap, help create volume in a drawing and emphasize the depth of the composition.
Next, try drawing a car from different angles. This will train your sense of volume and help you learn how to draw cars convincingly from any point of view.
Use the same principles presented in this lesson to draw a car from the rear, for example. Also apply the rules of linear and atmospheric perspective, and make the details in the foreground clearer and more varied than those in the distance.

However, perspective can change significantly depending on many factors, such as how you look at the object, where you are positioned, and where the object being drawn is located. In addition, the composition is influenced by how close you are to the object and by the degree of spatial compression you use.
For example, you can make the perspective more exaggerated by applying a technique that is often used in cinematography and in comics.

In this drawing you can see the same principles that were explained in the lesson, but applied in a slightly exaggerated way.
Objects in the distance decrease more strongly, the details in the foreground are much more contrasted and detailed than those behind them, and the overlaps work even more clearly due to the chosen angle.
For example, we chose the same car that we used in our Mercedes-Benz S-Class drawing tutorial, but here we will apply more of the basic drawing principles that help create volume in a drawing.
On our site, as usual, this is only an example of how you can draw a car in perspective. The same principles can easily be applied when drawing BMW, Audi, Volkswagen, or any other car.
In the same way, they can be used to invent your own car from scratch by designing its details and form, or even to draw other vehicles such as airplanes, trains, and so on.
For thorough practice, it is also very important to learn how to draw a car from the side, since perspective works somewhat differently there than in the three-quarter view.
In general, the most important principle in drawing cars is to try to draw as many vehicles as possible from different viewpoints and angles, applying the full range of techniques available to an artist.


Hi I sent you an email
I do nt believe so…
You sent Hi I sent you an email,not Email!!!!
Oh yeah his drawing is too good i drew it. It was Awesome
Wow what a talent……..am going to try it
Can you make BMWI8?
good
never ever better i say that good
haha this is too easy
butter?
Im not the greatest at curves, but it turned out not to bad for me, nice
ooookay then i spent my time better playing fortnite
Wow
Классно
So good!🤩🤩
cool
Same bro
Amazing
Super
Nice
It’s double Fab👌👌👌
AYO WTHH?
MABYE GET GOOD INSTEAD HAHHAHAH
Not Bad bro
This is so amazing! It shows me the directions of how to do it. Drawforall is the best drawing website!
This is a great tutorial! I’m a beginner and this has helped me a lot.
YO WHAT IS THIS CARR🔥🔥🔥🔥🔥
Excellent car drawing steps given I could teach my grand child nicely.
Thanks a lot
is your full name matthew henry cason
Show the video
GOOD and LOVELY
GOOD 💓💓💓💓💓💓
So amazing can you draw a audi rs8
We have a tutorial on how to draw an Audi R8, these cars share essentially the same look, so you can use it to draw an RS8.
What an amazing talent I’ll try it out
Many thanks, Victor!