How to Draw Eyes from the Front

This step-by-step tutorial will show you how to draw eyes from the front and explain in detail the main features and nuances of this angle.
Earlier, we learned how to draw eyes in a very realistic and three-dimensional style. There, we explained in detail the construction of the eyes, what creates their volume, and how to draw them step by step.
Here, we want to focus as closely as possible on the front view, since this is one of the most common angles from which artists draw this part of the face.
The ability to draw eyes from the front is essential for drawing frontal portraits.
How to draw eyes from the front step by step
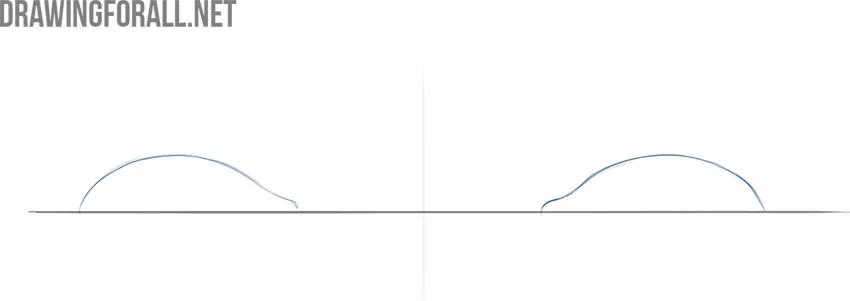
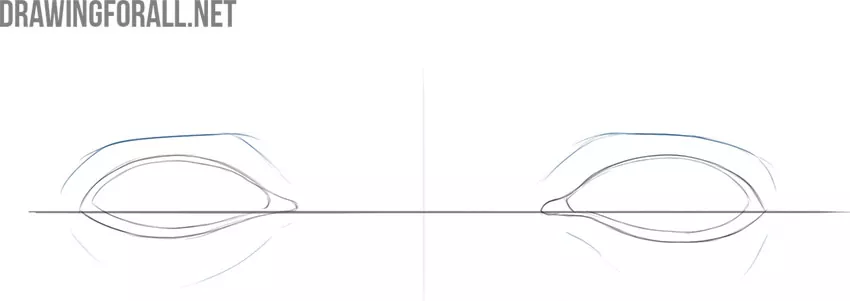
Step 1: Draw the guidelines of the eyes
First, draw a horizontal guideline that will help you place the eyes correctly on the surface. Then draw a vertical line in the middle, which will serve as the central axis and runs through the center of the face and head. When you draw the eyes straight from the front, these lines should be as straight as possible and positioned at a right angle to each other.

Step 2: Sketch the upper eyelids
Now mark the inner corners of the eyes on the horizontal line at equal distances from the center line. The distance between the eyes should be approximately equal to the width of one eye. Then draw the upper eyelids, rising upward and smoothly curving down. The outer corners should also be placed at equal distances from the center.
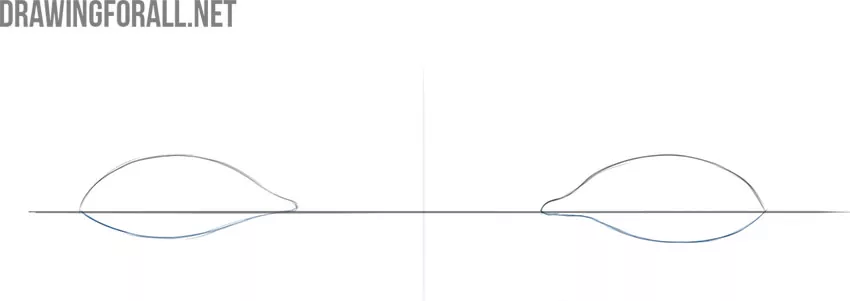
Step 3: Sketch the lower eyelids
From the inner corners of the eyes, draw lines extending outward and connecting to the outer corners to form the lower eyelids and complete the basic contour. The eyes should be symmetrical to each other and mirror the same shape. The relative height of the inner and outer corners may vary from person to person.
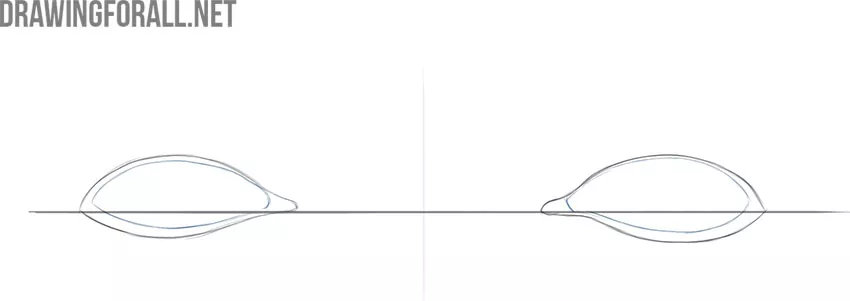
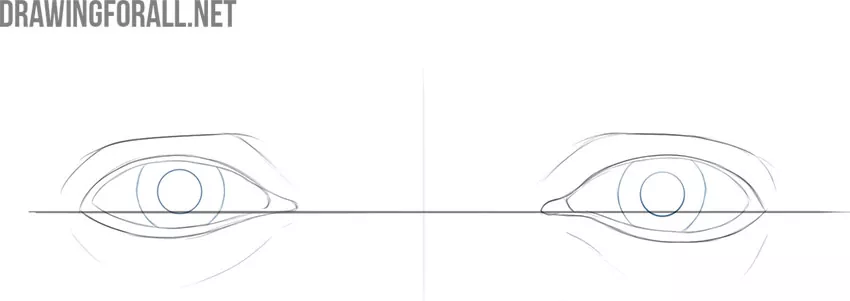
Step 4: Add depth to the eyelids
You have already outlined the outer edges of the eyelids; now it is time to indicate the inner edges that touch the surface of the eyes. The presence of both the outer and inner edges creates a sense of volume in the drawing. These inner contours should not exactly repeat the shape of the outer edges.
Step 5: Draw the folds above and below the eyes
The eyes create volume beneath the eyelids, and this should be emphasized in the drawing. Indicate the skin folds formed by the eyelids covering the eye sockets above and below the eyes. These contours should also remain approximately symmetrical.
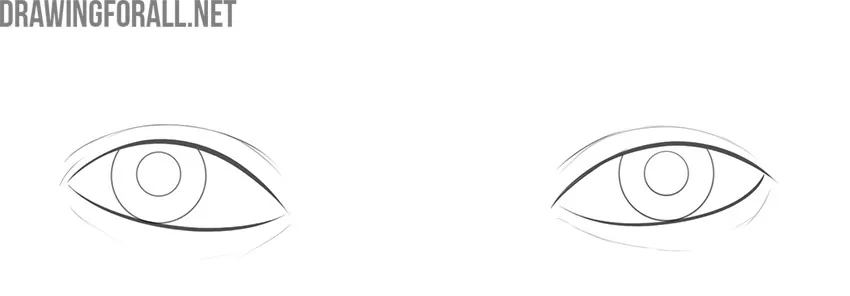
Step 6: Draw the pupils inside the eyes
First draw the outlines of the irises, partially covered by the eyelids. Then place the pupils in the center. The size and width of the pupils and irises should be the same, as well as their placement. The width of the pupils depends on the lighting and many other factors.
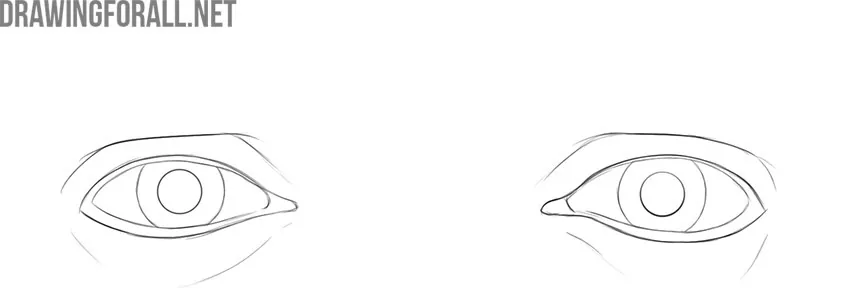
Step 7: Erase the guidelines and complete the drawing
Carefully and gradually erase the construction lines from your drawing, leaving only the final details. At this stage, you can also strengthen certain lines, add extra elements, and be sure to check the symmetry and proportions.
Step 8
Shade the pupils with a dark tone using horizontal pencil strokes. Then shade the irises with a slightly lighter tone, also using horizontal strokes and gradually reducing the pressure as you move downward. Use an eraser to remove a small area at the edge of the pupil and iris to create a realistic highlight.

Step 9
Keeping in mind the principles discussed in the sphere drawing tutorial, apply shading to the surface of the eye using hatching. Then add shadows on the eyelids and the cast shadow from the eyelid onto the eye. Consider the frontal placement of the eyes and the direction of the light when drawing the shadows.

Step 10
Finish your eye drawing by bringing all elements to a consistent result. Check the symmetry and proportions of the eyes once again. Review the tonal relationships and adjust them if necessary so the drawing looks convincing and realistic.

Principles of drawing eyes from the front
Accurate drawing of the eyes depends heavily on your understanding of proportions and the anatomy of this part of the face.
This is especially important when you draw eyes from the front, because when viewed head-on, any distortion in proportion, symmetry, or perspective becomes very noticeable.
When drawing eyes from the front, the most important task is to position both eyes correctly on the surface of the face and align them along the same horizontal axis.

There should be no vertical misalignment, and the angle between them must remain consistent. To achieve this, remember that the eyes do not float independently in space.
They are placed on the front plane of the face and therefore follow the same surface and direction as the face itself.
It is also important to keep the anatomy of the eyes in mind at a schematic level. The eyes are essentially two spherical forms set inside the eye sockets and covered by the volume of the eyelids.

The rounded shape of the eyeballs, combined with the thickness of the eyelids, the brow ridge above, and the bridge of the nose between them, creates a convincing structure.
This is the next key aspect to understand after learning how to draw the eyes themselves – being able to draw the surrounding structures, especially in a front view.
We rarely draw eyes separately from the face, so practice drawing them placed on a simplified head. This helps you learn to position the eyes correctly in relation to other facial features and keep them aligned with the same surface.
Practice drawing eyes in the correct position – both on their own and together with the brow ridge and bridge of the nose, and also in the full context of the face.

Practice drawing eyes from the front
But adding complexity isn’t the only way to improve your eye drawing skills. You can also try simplifying your eye drawings even further, experimenting with different shapes and details, or sketching from life.
For example, use reference images from the internet, sketch the eyes of people you know, or even study your own eyes in the mirror.
Adjust the shape of the eyes
For example, try changing the shape of the eyelids, the placement of the eyes within them, and the form of the folds.
People’s eyes vary greatly, with different shapes for each feature and element, as well as different distances between the eyes, angles, and proportions.
Simplify the form and shape
A very useful practice is also to draw eyes from the front using quick sketches. Do not focus on details, and do not try to build full volume every time.
The main goal is to place the eyes in the correct angle and keep them proportional.
As the saying goes, the eyes are the window to the soul and in visual art, they often serve as the focal point and emotional center of a portrait.
We’ve already discussed focal points and composition in our previous articles, and we’ve also emphasized many times that learning to draw eyes is one of the most essential skills for any artist.
Mastering detailed and complex eye drawings always starts with something simpler – like in this tutorial, where we focused on drawing very basic yet convincing eyes.