How to Draw Evil Eyes

Specifically for practicing and developing your ability to depict different emotions, we created this tutorial on how to draw evil eyes.
In this guide, we will show you how to draw eyes in a way that gives them an angry look and explain what influences how emotions are conveyed through this part of the face.
We will also explain how to make evil eyes more expressive and which elements can be used to make them more distinctive and unique.
The first thing to understand is that the entire process is built on the basic principles of drawing eyes.
The main idea is that the eyes are two spherical forms covered by the eyelids, with the eyebrows and surrounding bone structure above them.
It is the downward angle of the eyebrows, the wrinkles around the bridge of the nose, and the specific positioning of the eyelids that create an angry expression.
With this in mind, let’s go step by step and learn how to construct evil and angry eyes.
How to Draw Evil Eyes Step by Step
Step 1: Block in symmetry guides for the eyes
Draw a vertical line to represent the center of the face. It will help position the eyes at the correct distance from each other. Then add a horizontal line to place the eyes at the same level and maintain symmetry throughout the drawing.

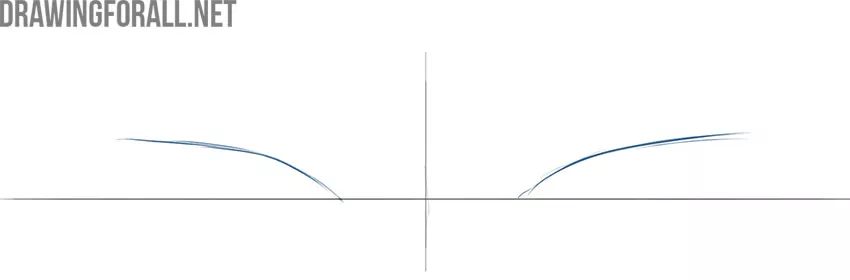
Step 2: Sketch the angled upper eyelid lines
Measure approximately equal distances from the centerline and mark the inner corners of the eyes along the horizontal guideline. Then mark the outer corners at matching distances. Using these points, draw the upper eyelids, angling them slightly toward the center to create an angry expression.

Step 3: Sketch the lower eyelid lines
Draw the lower eyelids using two smooth, matching lines. Connect the inner and outer corners while following the same tilt as the upper eyelids. The overall eye shape should angle slightly toward the center.

Step 4: Draw the folds around the evil eyes
Draw the folds above the upper eyelids to define the eye sockets, then add matching folds beneath the eyes. Keep the eye anatomy and the volume of the eyeballs in mind, and keep these details symmetrical.

Step 5: Sketch the angled eyebrow shapes
Draw the lower edges of the eyebrows with two smooth, symmetrical lines, angling them toward the center. Then define the upper edges, tapering the eyebrows toward the sides. Finally, erase the construction lines from the beginning of the tutorial.

Step 6: Draw the pupils inside the evil eyes
Draw the outlines of the irises, with their upper portions slightly covered by the eyelids. Then draw the pupils near the center of each iris. To strengthen the angry expression, make the pupils noticeably narrow.

Step 7: Draw shadows and texture on the evil eyes
Shading enhances the effect and gives the eyes a more intense appearance. Concentrate the darkest shadows around the bridge of the nose. Add texture to the eyebrows with symmetrical strokes, shade the pupils, and apply midtones for a stronger sense of volume.

Step 8: Adjust contrast and add details
Bring your drawing of evil eyes to a finished state by unifying the tones, details, light, and shadow. Make sure every element works together. You can also increase the contrast and add extra details if needed.

Evil Eyes in Practice and Character Design
Anger in the eyes is just one of many emotions an artist can convey in a drawing – one of countless variations that help create mood and narrative.
Human faces are diverse, and so are their eyes. Eyebrows, eyelids, wrinkles around the eyes, pupils, and eyelashes can vary greatly from person to person, so eyes with an angry expression can also differ significantly.
To feel more confident when drawing this emotion, be sure to practice using a variety of references, drawing angry eyes from different angles and with different features.

When it comes to anger in the eyes of villains and antagonistic characters, it is often defined not only by the position of the eyebrows and eyelids but also by distinctive details and features.
Scars, rough or uneven eyebrows, unusually shaped pupils, and other elements are an essential part of many memorable antagonists.
Drawing such features is an effective way to practice creating more interesting characters. Combine these elements with different eye angles and shapes to develop a wider range of expressive designs.

It is important not only to draw angry eyes on their own but also to place them correctly within the full face and integrate them with the other features. The nose, lips, and overall facial structure should all support the same expression.
To practice this, try drawing a full face using this tutorial on angry eyes, adjusting the other features so the character appears more intense.
This kind of practice helps you understand how facial elements relate to each other and builds confidence in further drawing studies.