How to Draw a Zebra Face

This tutorial will show you how to draw a zebra face, capturing its distinctive shape and depicting its striped pattern.
To draw a zebra’s face correctly, keep in mind that its head shape is very similar to that of a horse or a donkey. The main distinguishing feature, of course, is the characteristic striped pattern.
These stripes have many specific nuances, which we will cover in this tutorial so you can depict them as convincingly and realistically as possible.
In addition, unlike our tutorial on drawing a zebra’s head, this tutorial places a stronger focus on the facial details and how they can vary in a zebra.
How to draw a zebra face step by step
Step 1: Outline the zebra’s head base
Indicate the cranial part of the head as a sphere, positioning it so there is space below for the neck and muzzle. Use light, easily erasable lines, so avoid pressing too hard with the pencil.

Step 2: Draw the zebra muzzle and neck
Indicate the zebra’s muzzle as a cylindrical form that narrows toward the tip. Mark the very end of the muzzle, where the nose will be, as a small sphere. On the underside of the head sphere, sketch the neck, widening as it extends downward.

Step 3: Draw the zebra eye guideline and ears
On the head sphere, slightly above the base of the muzzle, draw a guideline that will help you place the eyes of the zebra. Curve this line to follow the spherical form. At the top of the head, lightly indicate the ears with simple, general shapes.

Step 4: Sketch the animal’s mane and jaw
Sketch the mane with simple, non-detailed lines, starting from the midpoint between the ears and moving downward, following the curve of the neck. At the base of the muzzle, where it connects to the skull, indicate the jaw muscles with a smooth, rounded form.

Step 5: Draw the zebra eyes in detail
Starting from this stage, you will begin drawing the zebra’s face using the previously established guidelines. Begin with the eyes, placing them along the horizontal axis drawn specifically for them. In zebras, as in many mammals, the eyes are not positioned at the front of the face but on the sides, lying on different planes relative to each other and the center of the face – keep this in mind while drawing.

Step 6: Detail the nostrils and mouth
The nostrils are also positioned on either side of the central axis of the face, so draw them with this in mind, taking into account the different planes. Then, using smooth lines, define the outline of the mouth. Refine the muzzle, giving it a cleaner and more fluid appearance while conveying the natural curves of this part of the zebra’s face.

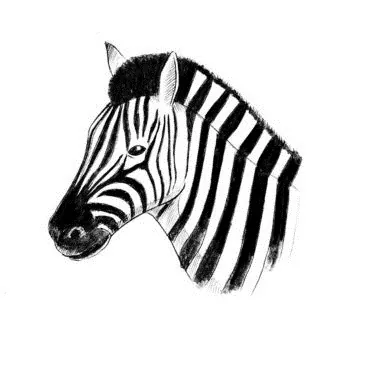
Step 7: Draw the zebra stripe pattern
The stripe pattern on a zebra’s face is arranged symmetrically, radiating from the center. All lines should follow the curves and turns of the forms of the face and neck. In the central area, the stripes are smaller and become larger as they move toward the neck. On the neck, they take on a simpler, vertical alternating pattern.

Step 8: Shade the eyes and stripes
Start with the darkest areas by shading the eyes, leaving a small highlight. Then darken the nostrils and the mouth. After that, use smooth hatching to fill in the dark stripes of the zebra’s pattern, keeping them slightly lighter than the eyes.

Step 9: Add simple shadows
The zebra’s head is a three-dimensional form, like everything in the real world, so add shading to emphasize this. Keep the principles of light and shadow in mind, and carefully apply hatching to the lower planes of the muzzle as well as to the areas turned away from the light source.

Step 10: Finalize the zebra face
Finalize the zebra face drawing by bringing all elements together into a cohesive whole and removing anything that looks out of place. At this stage, you can enhance the contrast, refine the tonal relationships, and add additional midtones.

Zebra face drawing practice
A zebra, like any other mammal, has a wide range of facial movements, and the ability to draw them makes an artist more versatile in their work.
As always, this comes down to regular practice and observation. Using references, try drawing a zebra’s face from different angles and capturing various expressions, without exaggeration or distortion.
Aim to maintain authenticity and realism, staying within the natural range of movement of a zebra’s face.

The next, more advanced step is to draw a zebra with a detailed depiction of all the features of the head and face.
Try drawing the animal in full body, also capturing different movements of the face, head, and the entire body. You can also draw a baby zebra, conveying the characteristic features of a juvenile.
While drawing, keep in mind the volume of the body parts, and remember that the stripes should follow and wrap around these forms.

To further improve your skills, practice drawing animals that are similar in appearance, making sure their differences are clearly visible.
For example, you can draw a horse’s face, keeping in mind that unlike a zebra, it has no stripes and slightly different proportions in the muzzle and head.


The drawing was a bit hard, but in the end I got to draw a zebra face. Thanks!
love it
Awesome 👌 tutorial
The mouth is very confusing but I think I succeeded in the end
It’s not bad, you just need practice 😒
Operas problem, good tutorial by the way I loved it