How to Draw a Sphere
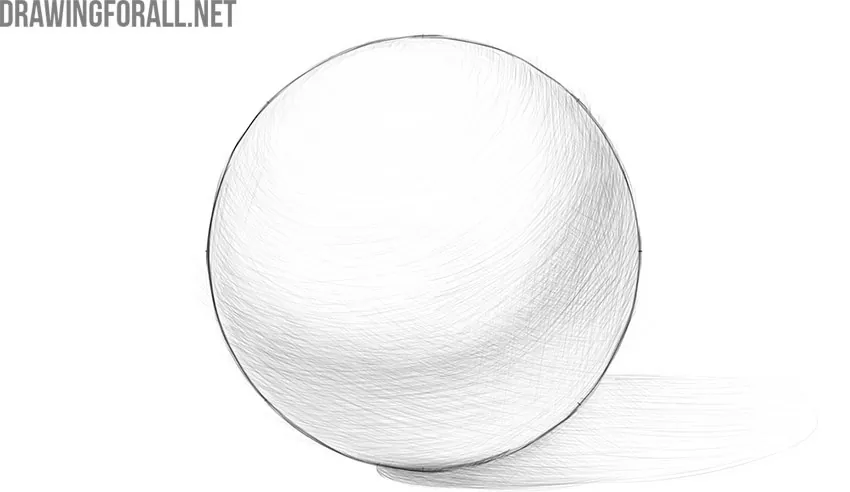
This basic tutorial will show you how to draw a sphere, one of the most fundamental three-dimensional forms that underlies visual art.
As we have mentioned many times in our previous tutorials, when drawing complex objects, you should represent them as simple geometric shapes. For example, spheres are often used to depict shoulders, knees, or elbows.
When drawing a sphere or a ball, it is important to clearly visualize its three-dimensional form and attempt to depict that volume on a two-dimensional surface. In other words, you should aim to draw a sphere, not just a circle, and below we will show you how to do that.
How to draw a sphere step by step
Step 1: Draw the symmetry guidelines
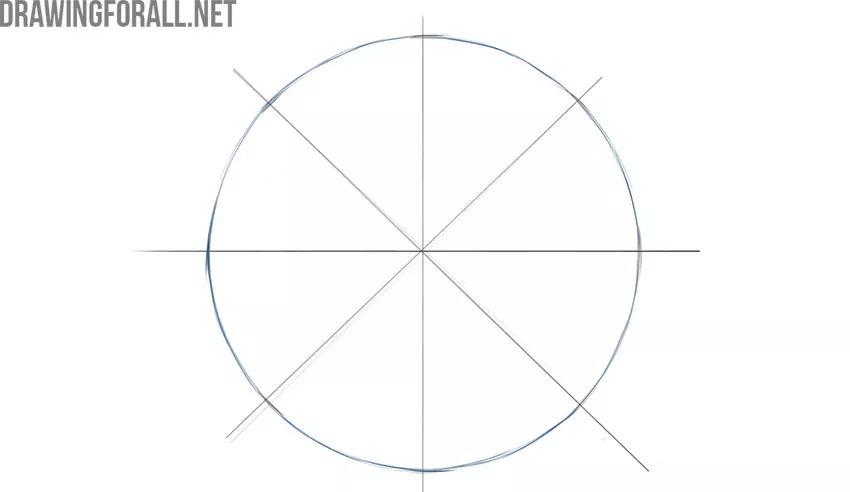
Since you are drawing a sphere or a ball, it should be as even and proportional as possible. To achieve this, you need to mark the lines of symmetry. Using very light pressure on the pencil, sketch two intersecting lines. The point where these lines intersect will represent the center of the sphere.

Step 2: Sketch additional symmetry lines
Now add two more lines that also intersect at the very center. In general, the more guidelines you draw, the easier it will be to create an even sphere. However, do not rely solely on these auxiliary lines. Try to develop the ability to draw spheres using as few guidelines as possible.

Step 3: Mark equal distances from center
Now, measuring an equal distance from the center, mark short crosswise strokes on each of the guidelines from the previous steps. As a result, you should have small marks placed evenly around the center, which will help you draw the sphere as accurately as possible.

Step 4: Draw the sphere outline
Using a long, smooth line, carefully connect all the small marks from the previous step to create the most even and rounded shape possible. If you do not manage to draw a perfectly round sphere on the first attempt, do not worry. Simply erase the unsuccessful part carefully and try again. You can also begin with very light strokes to indicate the placement of the sphere, gradually darkening the circle as you refine the form.
Step 5: Clean up the sphere contour
Now set the pencil aside for a moment and use an eraser to remove all the auxiliary lines created in the previous steps. You can refine the outline of the ball and correct any uneven areas. To check the overall shape of your drawing, look at it in a mirror.

Step 6: Draw shadows on the sphere
Now it is time to make the ball appear three-dimensional by applying shading. Using very light, rounded strokes, begin to build up the shadows gradually, always keeping the spherical form in mind. Notice how the hatching lines wrap around the ball from all sides.

Step 7: Add more sphere shadows
Continue building up the shading. The strokes should still follow the curvature of the surface, reinforcing the rounded and three-dimensional appearance. Add a cast shadow beneath the ball to enhance the sense of volume and solidity. When working on the shadows, be sure to follow the basic principles of drawing light and shadow, which we discussed in the corresponding article.

Step 8: Draw the core shadow
Be sure to include all the essential elements of light and shadow. Pay attention to the darkest and lightest areas. We discussed all of this in the article on light and shadow mentioned above.

Step 9: Review the sphere drawing
Review your entire sphere drawing once again. Carefully look for any inaccuracies or mistakes and correct them. Pay close attention to the overall shape and to the relationship between light and shadow in your drawing. View your artwork from a slight distance or check it in a mirror so you do not overlook any errors.

In this tutorial, we showed you how to draw a sphere, an extremely useful form that underlies virtually all visual art.
Drawing a sphere is important not only for the practical task of depicting a specific object. It is essential for understanding volume in rounded forms and for accurately conveying that volume on a flat sheet of paper, allowing you to create a convincing three-dimensional effect on any surface.
We see spheres around us almost everywhere. Even the human head, in its basic form, is close to a sphere. Properly applying shadows is one of the most important aspects of turning a simple flat circle into a convincing sphere. This is a skill that should be practiced regularly and refined as much as possible.
At the same time, drawing a circle itself is also important. The circle should be as even as possible, without distortions or irregularities. This skill should also be practiced consistently, both with the help of guidelines and without them.
However, drawing a sphere or a circle is not the ultimate goal of this tutorial or of developing this skill. Once you have mastered drawing accurately constructed spheres, begin applying this ability in practice. Try depicting various spherical objects with more complex forms and textures.
For example, you can attempt to draw the planet Earth or illustrate the human body, keeping in mind the spherical nature of the shoulders, the head, and other parts.
Apply shading carefully and correctly, in accordance with what you learned in this tutorial and in our detailed article on light and shadow.