How to Draw a Ninja

This lesson will show you how to draw a ninja, a Japanese stealth warrior dressed in a canonical hooded costume with a mask.
This image, although shaped by modern media, is based on the traditional figure found in Japanese stories and legends.
A ninja is usually dressed in a loose black outfit with the characteristic hood and mask. The design can also include a vest, and the head may be covered not with a hood but with a tight mask with long trailing ties at the back.
One way or another, the appearance of this warrior is distinctive, and we will try to convey it in our lesson – and you can customize the look as you move through the steps.
How to draw a ninja step by step
Step 1: Sketch the basic stick figure of the ninja
First, draw a stick figure of the ninja. A stick figure – made of sticks and circles – helps outline the character’s proportions and position on the paper. As in all our man drawing lessons, sketch an oval as a guide for the head, and use simple lines to indicate the body. Consider the rules of human body proportions when drawing a figure already at the first stages, as correcting the proportions later will be more difficult.

Step 2: Mark the facial guidelines and torso
Mark the ninja’s head using two perpendicular lines: a vertical line that shows facial symmetry, and a horizontal line that marks the eye level. These two lines should intersect roughly at the bridge of the nose, and you can already determine the head’s rotation at this stage. Next, outline the visible part of the neck as a short cylinder directly beneath the head. After that, use light lines to give volume to the torso of the night warrior.

Step 3: Sketch the arms using cylinders
Now begin blocking in the limbs, starting with the arms and outlining them as cylinders. First mark the cylinders for the upper arms, then sketch the lower sections. After that, lightly indicate the hands at the ends. As you map out the limbs, be sure to account for perspective shifts and the proportions of the human body.

Step 4: Sketch the warrior’s legs
Do the same with the lower part of the ninja’s figure. At this stage, it’s best to think of the body parts as simple geometric forms. The groin area can be seen as a triangle, and the upper legs as cylinders that narrow toward the knees. The shins have a distinct curve created by the calf muscle. Then, mark the feet the end of the legs as two smooth shapes.

Step 5: Draw the mask of the ninja
Now that the ninja’s silhouette is ready, begin adding the details. We usually work from top to bottom – from the head to the feet – and this drawing lesson will follow the same approach. Draw the hood and the mask that covers the lower part of the face. In this step, also outline the eye, using the facial guidelines from the second step as a reference. The mask should also be constructed with the help of these lines.
Step 6: Illustrate the upper kimono section
Now move on to the torso and start adding details there. First, outline the collar of the upper part of the kimono with a couple of long lines. Try to show the volume and loose fit of this section of the ninja’s costume. Additionally, you can mark some initial folds to the kimono.

Step 7: Draw the ninja swords and sleeves
Now, continue the lines from the previous step and draw the sleeves trying tho make them look dimensional snd wide. Add folds to make them look more authentic. Then, draw out the hands of the warrior in detail. Next, draw the katanas in the hands or replace them with wakizashies as in our example – shorter swords.

Step 8: Detail the lower body of the shinobi
Trace the legs with wavy contours, as in our example, to indicate the fabric folds. Erase the extra guidelines from the previous steps and draw the outer contours of the pants. Note that the pants become more fitted as they approach the legs. Here, draw the belt and the lower part of the upper garment that hangs below the belt.

Step 9: Draw out the eyes of the ninja
Now move on to the head and begin giving the Japanese warrior a more finished look. Start by drawing the eyes, using the earlier guidelines. Then mark the eyebrows above them and the visible part of the nose beneath. After that, use dark, clean lines to carefully define the contours of the mask.

Step 10: Detail the shinobi’s hood
Now move on to the hood and, using dark final lines, carefully refine its contours to give them a more finished appearance. Then add the folds in the neck area so the hood looks more authentic and natural. Erase the guidelines from the head and refine the outer lines of the hood.

Step 11: Start detailing the arms and kimono
Now move on to the torso and, using similar dark lines, carefully refine the kimono and the shape of the collar. Then draw the belt around the waist, which gives the warrior’s silhouette its recognizable look. After that, detail the fists by carefully outlining their shapes and fingers. Proceed to the right hand and sword and use smooth lines to trace it, giving it a cleaner and more finished appearance. To enhance realism, add the folds on the clothing.

Step 12: Detail the second arm and katana
Now repeat the actions from the previous step and refine the second arm, making it cleaner and more detailed. Then draw the second sword, again aiming for a clear and finished look. Move on to the lower part of the body and outline the lower section of the kimono around the waist and upper legs, giving it a sense of volume. Erase all unnecessary construction lines from the upper part of the body.

Step 13: Detail the shinobi’s lower body
Use a few horizontal lines around the ankles to draw the straps that wrap this part of the legs and hold the lower sections of the pants. Leave the strap ends slightly loose to create a more dynamic effect. Add a few short lines to suggest the folds in this area. Then finish the legs by carefully drawing the feet and erasing all unnecessary construction lines from the lower part of the figure.

Step 14: Add shadows to the Japanese warrior
Now give the ninja drawing a more dimensional and realistic look. To do this, add shadows based on the direction of the light falling on the Japanese warrior. Use even hatching to place shadows on the mask, the folds of the clothing, and the swords. To make the blades look more realistic, add highlights with clean, sharp strokes.

Other ways to draw a ninja
Drawing a standing ninja with katanas
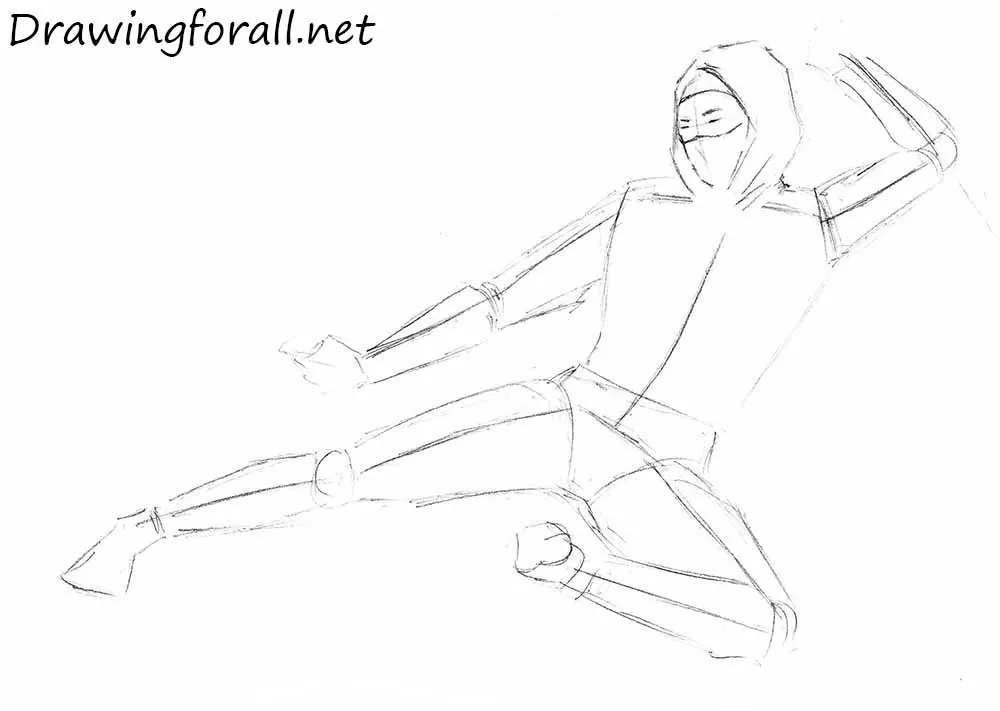
In the previous lesson, we drew a ninja in mid-jump with two in his hands, and now we will try to depict the Japanese warrior in a different pose.
In this version, the ninja is standing in a combat stance and pulling a katana from behind his back. The step-by-step construction of the figure will be very similar to the main lesson, but here the character is shown from a different angle, so the details will change accordingly.

How to draw a cinematic ninja
Now let’s move from the more traditional shinobi style to something less conventional and draw the ninja guards of Shang Tsung from the 1995 Mortal Kombat film.
These ninjas have a very distinctive look without the classic kimono, wearing wide pants and a mask similar to a balaclava.
This lesson will show you that media includes a wide range of ninja variations with different costumes and details.
This character has a striking, cinematic appearance, and using this approach you can draw many other similar and interesting figures.

In this ninja drawing lesson, we learned how to depict a canonical shinobi in several different versions. First, you drew the Japanese warrior in a dynamic jumping pose, then you illustrated him in a static stance with a katana, and finally you learned how to draw a very unusual, cinematic variation.
All of these approaches will help you portray any type of shinobi – from the classic historical versions to those seen in modern media.
For example, you can draw Scorpion from Mortal Kombat or draw Sub-Zero from the same series using nearly the same steps.
If you want to continue exploring Japanese warriors, be sure to visit our samurai drawing lesson – a completely different type of fighter from the same region and era, who also became extremely popular in games, films, and comics.


cool ninja
Thanks
thanks
Thanks for checking it out, Liam.
did you draw this your awsome
Yes, I drew it – happy you enjoyed the guide.
Nice!!😳😳
Cool ninja
Thanks! Always fun to work on ninja themes.
Cool ninja
Appreciate it.
Awesome and amazing
Thanks, glad it helped you.
i drawd it and it whas very difficult but with a good picture. thank you!
Nice job finishing it. Good to hear it came out well for you.