How to Draw a Ship
In this tutorial we’ll show you how to draw a ship. There are many straight lines and geometric shapes in this drawing lesson. Therefore, it will be quite a challenge even for experienced artists.
A ship is a very large object, and when drawing it we need to try to recreate the volume on paper. To do this, we will use all the principles of linear perspective and aerial perspective.
In addition, we will try to use the principle of drawing the entire object at the same time, that is, not concentrating on one point, but drawing the ship making small changes and returning regularly to finish drawing and adding details.

How to Draw a Ship Step-by-Step
Step 1: Sketch the bottom of the ship
So, first draw a long, elongated trapezoid at the bottom of the piece of paper. The corners are located only on the left side of the drawing sheet, all other parts are smooth and rounded. Using the rules of linear perspective, make the front of the ship noticeably larger than the rear part. It’s like the first step in drawing a fighter jet.

Step 2: Sketch the top of the ship
Add another trapezoid to form the top of the ship’s hull. This is a larger trapezoid compared to the figure from the previous step. Again, use the rules of linear perspective and make the front larger. Also, you can use the rules of aerial or atmospheric perspective, making the rear part lighter and less contrasting. This will make your ship drawing look more dimensional and voluminous.

Step 3: Draw the top floor of ship in detail
Create the top of the ship’s deck. These lines will later represent the cabin windows. Use long, straight strokes. If the line feels too long to draw in a single motion, draw part of it first, then continue with a second hand movement. Try to do this without using a ruler to get the most out of the practice and improve your skills as an artist.

Step 4: Detail the middle part do the ship
Now let’s start drawing the middle decks, which look like paired horizontal lines inside the trapezoid from the second step. Try to draw it as straight as possible. As you can see, the lines should bend at the front of the ship in such a way as to show planes. In the lesson on drawing a cube, we talked in detail about how to create volume in angular objects.

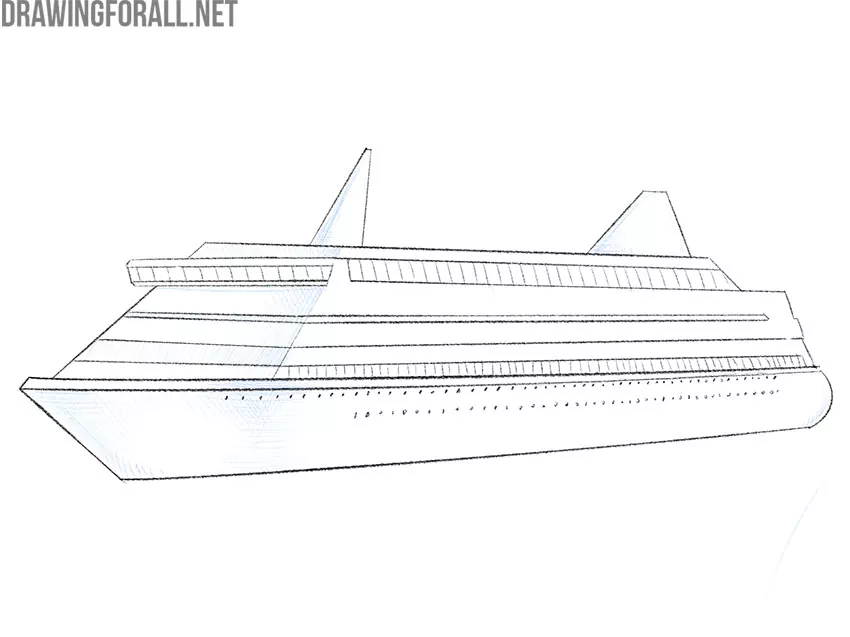
Step 5: Draw the bottom deck of the ship
This is the completion of the work of drawing the decks of our ship. Add three more smooth horizontal lines in the middle part of the ship’s hull. As with the previous step, the lines should curve towards the front and follow the outline of the vehicle to give your ship drawing a three-dimensional look.

Step 6: Draw the ship antennas and windows
So, we are approaching the final steps of our ship drawing tutorial. In this step, we will draw two antennas using triangles at the top of the drawing, and also draw the ship’s windows using short vertical lines. In addition, you can draw additional details, such as people on the decks or additional antennas on the top.

Step 7: Add the portholes and bottom windows
Add some more details to make your ship drawing look more realistic. Repeat drawing the vertical lines at the bottom of the ship. Add also dots or very small circles in two rows as in our sample. These details will represent the windows and portholes of the vehicle.

Step 8: Erase the construction lines
In this step, you can remove extra lines and check that all shapes are correct. Study your drawing as accurately as possible, check the proportions and perspective. Then, correct inaccuracies with a ruler if it is too noticeable.

Step 9: Add hatching to the ship
Let’s work with the shadows. Determine where the light is coming from. Apply a little shading to the areas of the ship that are blocked from the light. A more intense hatching is formed by two layers crosswise.
As a result, you can see something like this picture. You can complicate this with more complex shadows or additional details.
Ships and boats have been an integral part of visual art, appearing in many forms since ancient times. From Egyptian reliefs and painted amphorae to Renaissance masterpieces and modern works, ships have been depicted in a wide range of styles and contexts.
One of the most well-known marine artists, Ivan Aivazovsky, frequently included ships in his paintings, sometimes sailing calmly across the water, other times caught in violent sea storms. Today, you’ve learned how to draw a ship, and we believe it’s a solid first step into the world of marine art.
We hope that this was a useful drawing lesson for you. Do not forget to write to us in the comments about how good the result you got. Either way, keep practicing your drawing skills to become the best.