How to Draw a Blooming Rose

Want to learn how to draw a blooming rose in a realistic style? With this tutorial, you will learn how to do it quickly and easily.
In other lessons, we showed you how to draw a closed rose with a cylindrical bud and petals tightly pressed together.
We also demonstrated how to draw an open rose with a fully blooming bud and petals spreading outward in different directions.
Here, we want to show you the middle stage, when the bud is no longer completely closed but has not yet fully bloomed.
How to draw a blooming rose step by step
Step 1: Outline the rosebud and stem
First, depict the “skeleton” of the blooming rose drawing. To do this correctly, outline an oval shape, similar to an egg, for the bud and a long vertical line for the stem. Draw all these lines with very light pressure on the pencil, without trying to make them perfectly smooth or clear, since these construction lines will be erased later.

Step 2: Draw the central petals of the blooming rose
Let’s start sketching the petals from the very center of the flower. Closer to the top of the oval, or egg shape, from the first step, draw a short curved line. Surround this line with additional lines. The petals of the rose should be sketched so that each new petal line surrounds the previous one.

Step 3: Sketch the larger petals around the center
Continue creating new petals. Each new line should be larger than the previous one and, as mentioned earlier, should surround the previous petal. Do not forget to use very light, almost transparent lines. To convey the feeling of a blooming flower, try to maintain the correct spacing between each successive petal.

Step 4: Draw the outer petals of the blooming rose
In the fourth step, sketch the outermost flower petals. These are the largest and widest petals, extending beyond the outlines of the oval from the first step. They should completely surround all the other petals. They should not press too tightly against the central petals as in the closed variation, nor should they spread too far outward, almost horizontally, as in a fully opened bud.

Step 5: Add the sepals and trace the stem
Now let’s draw the sepals below the blooming rose, the parts of the flower located directly beneath the bud. Then make the stem of the rose thicker by adding another line that follows the construction guideline of the stem from the first step.

Step 6: Draw the leaves of the blooming rose
With the help of a few simple lines, sketch the leaves of the rose. Try not to make them too even or identical, because we are depicting a real rose, not an artificial one. The basic contours of the rose are now ready, and starting from step seven we will move on to the final detailing of the flower.

Step 7: Refine the inner petals of the flower
To make the sketch beautiful and realistic, carefully trace the rose petals. Start with the inner petals, making them dark and defined. To give them a more natural and realistic appearance, make the edges slightly uneven while still keeping them smooth.

Step 8: Refine the outer petals of the rose
Do the same with the outer petals. They should also become dark and defined, with outlines that are slightly uneven yet very smooth. Make the lower edge of the bud rounded and smooth, creating contours similar to the shape of a vase or a waist.

Step 9: Refine the stem of the blooming flower
Now let’s work on the rose stem. Trace the lines, making them dark and defined, as in the example below this text. The stem should not be as perfectly even as a cocktail straw. Slight unevenness will give your rose a more natural appearance.

Step 10: Refine the rose leaves and veins
Not only the bud and stem of this wonderful flower, but also its leaves should look natural. To make them appear more realistic, create slightly zigzag and uneven edges. In addition, add the veins on the leaves.

Step 11: Draw shadows on the blooming rose
The drawing of the blooming beautiful rose is almost complete and already looks quite realistic. Let’s add the final touches and some shadows to make it even more dimensional and realistic. Using standard hatching, apply shadows in the least illuminated areas.

Step 12: Refine the tones and shadows
Add more halftones and tonal transitions, making the dynamic range wider and the drawing more dimensional and realistic. In addition, you can increase the contrast in your blooming rose drawing by darkening the shadowed areas and indicating highlights.

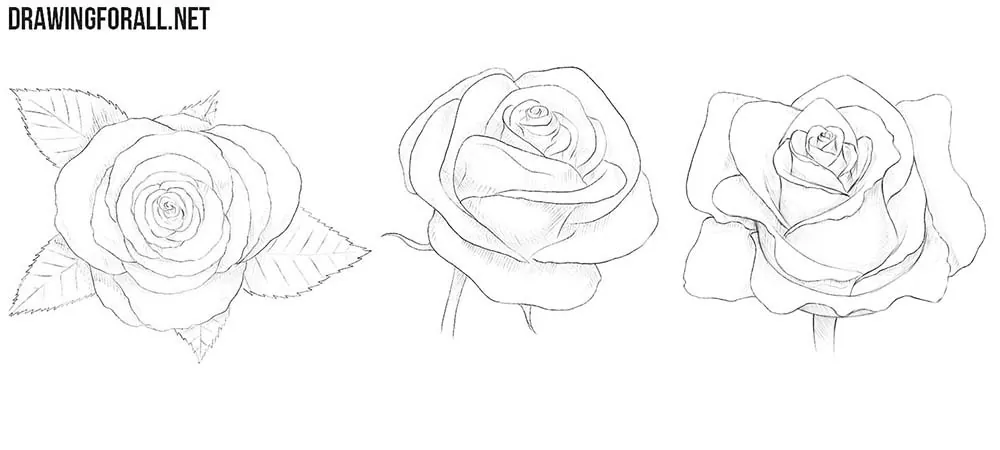
Advanced practice for drawing a blooming rose
We advise you not to stop at this point. To improve your fine art skills, try drawing any of these three roses using the steps from our guide.
Despite the fact that all three of these graceful flowers look quite different, the basic drawing principles remain the same.
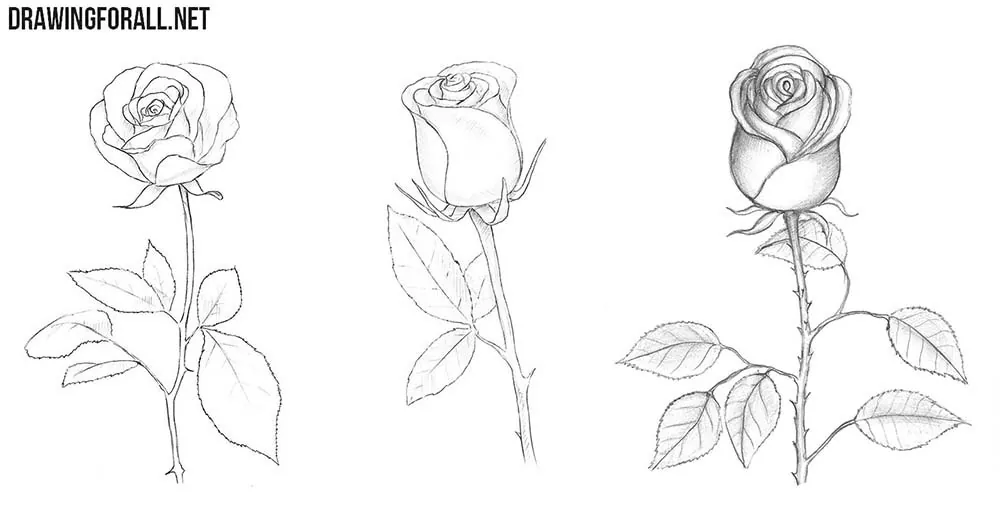
To raise your skills in fine arts even higher, try to draw roses of different types and sketch various types of buds from the various points of view.
Learn to draw various shapes of petals and stems. Develop your skill to the point where a person looking at your rose sketch can almost imagine the fragrance of this beautiful flower.
So do not forget that the most important teacher of any artist is practice and time. Practice as often as possible with our instructions about fine art, and you will a real professional artist.
And of course, don’t forget that the team of Drawingforall.net constantly creates new tutorials, and we will be very grateful if you visit the pages of our site and share our tutorials.
On the Pinterest we publish all the simplified versions of our lessons that will help our readers learn to draw quickly and without problems. So be sure to subscribe us there, so as not to miss a single drawing tutorial.


should do chibbi rappers, or the walking dead
Of course. In the near we will publish a huge number of new lessons about chibi characters. So do not forget to visit our site to not miss them.
Y’all really need to try
Yas Chibi rappers would look cool.
So true 🙂
very usefull
We are very pleased that our lessons are useful.
do a ringmaster
omg love that
this helped a lot
THIS IS GREAT
Thank you so much 💎💙
Wonderful , really helped my daughter with her art homework 🎀
Yayyyyyyyyyyyyyyyyyyy!!
Thank you for this drawing tutorial
Thank you so much!! This site is awesome! I would love it if you could do some step by steps on how to draw a fox. Thanks! (:
Great idea Grace! Foxes are one of my favourite animals ❤ !
I like the tutorial. I was…helpful…The rose is nice too. I’m only using this to get better at drawing roses. I started yesterday.
Nice drawing can u teach me?
Our drawing lessons contain all our knowledge of drawing. On the pages of Drawingforall.net, you can learn to draw using our guides. Try starting with the Basic Drawing Tutorials category. Having mastered all the articles from there, you can greatly improve your drawing skills.
wow!!!!
Great
can you plz do a step by step paul walkers skyline nissan gtr r34 car plz
OMG I REALLY LIKE THIS and for those who didn’t draw it you really have to try it!
I love it thank you so much for all tutorials. Can I use the design of the rose for a tattoo for me please ?
Hi, Nelsye and thank you so much. Yes, of course – you can use this drawing for your tattoo.