Lesson 4: Pencil Control, Lines, and Hatching

After learning the fundamentals of drawing, developing your artistic vision, and understanding how to control the drawing process, the next step is to move into practice, learn how to control your hand in the drawing process, hold a pencil, draw lines, and apply hatching.
At this stage, it is important to train not only your knowledge and understanding, but also your hand.
This is the transition from theory to practical work. From this point on, drawing tools will be used regularly, and your focus shifts to applying what you have learned.

Like any complex skill, drawing begins with the simplest elements. Even the most complex and realistic drawings are built on the ability to draw simple lines and create controlled strokes. This ability, in turn, starts with proper hand control and the development of muscle memory.
You need to learn how to hold the pencil correctly, control your hand movement, and produce clean lines, strokes, and contours. These basic skills form the foundation for all further practice.
Holding the Pencil

To draw with control and accuracy, it is important to hold the pencil correctly. The way you hold it directly affects line quality, freedom of movement, and the overall result of your drawing.
The arm has several points of articulation: the fingers, wrist, elbow, and shoulder. The more you rely on larger joints, the longer and more fluid your lines will be. Conversely, the more you rely on smaller movements of the fingers, the more precise and detailed your drawing will become.

There are two main ways to hold a pencil. The first is the familiar writing grip, often called the tripod grip. It provides high accuracy and is well suited for small details, short lines, and precise strokes.
The closer your fingers are to the tip, the more control you have, but the more restricted your movement becomes.

The second method is more commonly used in academic drawing. In this approach, the pencil is held farther from the tip, and the hand does not rest on the surface.
This grip allows for a greater range of motion, making it easier to draw long lines and work more freely, especially in the early stages of a drawing or when shading large areas.

These two methods are not opposed to each other. They serve different purposes and can be used together within the same drawing.
As you work, you can adjust your grip depending on the task – whether you are constructing the form, refining details, or developing tone.

The pencil should be held firmly enough to maintain control, but the hand should not be tense. Excess tension leads to stiff and uneven lines.
It is also important to hold the pencil in a way that does not block your view of the drawing. For this reason, it is often better to hold it slightly farther from the tip. This helps you see the work more clearly and maintain control over the overall result.

Over time, proper pencil control should become automatic. You should not have to think about how you hold the pencil, just as you do not think about basic movements when walking or riding a bicycle.
Pencil Control: Lines and Hatching
Lines are the foundation of any drawing. No matter how well you understand form, proportion, or construction, if your lines are uneven or hesitant, the drawing will not look convincing.
Lines

Line in drawing serves many functions and is essentially the foundation of visual art. It is part of the final image, creates form, conveys volume, and describes texture. In addition, lines are used to build the initial sketch, helping construct the drawing before being erased.
A line should be drawn confidently and cleanly. Instead of slowly building it with many small, uncertain strokes, aim to draw it in one clear motion.

Before making a line, it is useful to plan it and sometimes repeat the movement in the air, then execute it with a single controlled stroke.
If a line is too long, it can be built from several shorter segments, but they should connect smoothly and feel like one continuous line.
At the beginning of a drawing, lines should be light and easy to correct. As the drawing develops, they can gradually become darker and more defined. This approach allows you to refine the drawing step by step without fixing mistakes too early.

The line does not have to be the same thickness throughout the entire drawing. To emphasize atmospheric perspective, lines in the focal area and those closer to the viewer should be thicker than lines in the distance.
To convey the weight and volume of an object, the line should be thicker along the lower parts of the forms than along the upper parts.

The lower areas of objects tend to collect more shadow, while the upper areas receive more light; by making the line thicker in the lower areas, you subtly suggest light and shadow, giving the object a sense of weight and volume. This applies when drawing objects under consistent lighting.
Line weight is also increased at bends, edges, and points of contact between forms. This follows the same principle as strengthening the line along the lower parts of objects.

Hatching
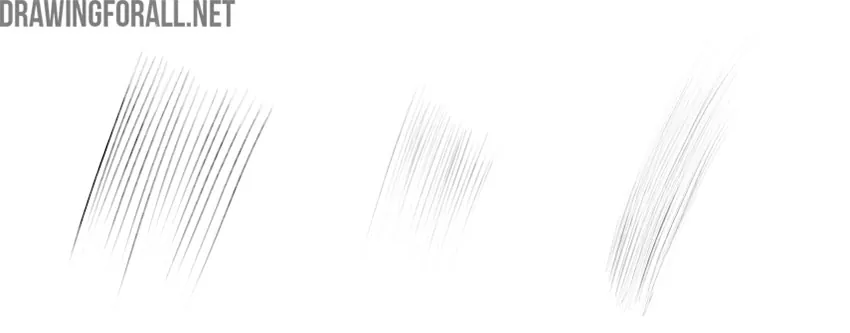
Hatching is essentially a rhythmic system of lines made with short, repeated movements. Unlike long continuous lines, strokes are applied in sequence and are used to construct tone and volume.
If you cannot control your lines, you will not be able to control your hatching, and as a result, you will not be able to properly convey form.
It is also important that lines and strokes are not uniform. Their direction, length, and density should follow the form of the object.

Hatching can be applied in different ways. The simplest method is parallel hatching, where all strokes follow the same direction. To increase the darkness of a surface, additional layers can be added at different angles, creating cross-hatching. Each new layer increases density and deepens the tone.
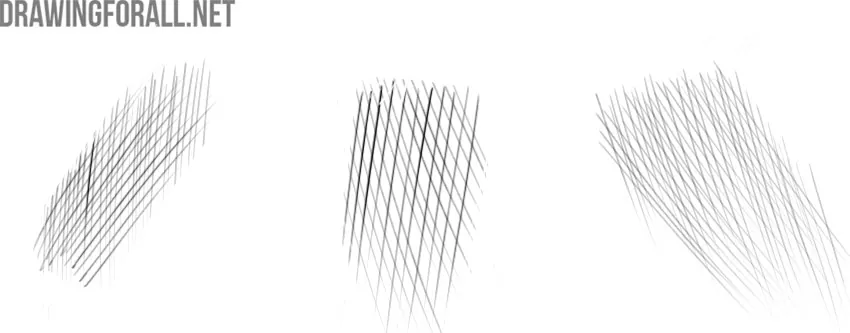
At the same time, it is important not to overbuild the surface with too many layers. Excessive hatching can make the drawing look dirty and lose clarity. Tone should be built gradually and in a controlled way.
The direction of hatching should follow the form of the object. On flat surfaces, strokes can remain straight and uniform. On curved or complex forms, strokes should follow the shape and wrap around it. This helps reinforce the volume and makes the drawing more convincing.

Hatching also plays a key role in creating depth. Areas that are closer to the viewer should have stronger, denser hatching, while distant areas should be lighter and less detailed. This difference helps create a sense of space.
There is also a difference between light and shadow areas. In shadow, forms become less defined, so hatching should be more general and unified. In light, forms are clearer, so strokes can follow the structure more precisely.

Pencil Control: Exercises and Practice
This lesson is more focused on practice than theory. From this point on, as mentioned earlier, you need to train not only your knowledge but also your hand.
Therefore, pay close attention to the exercises and repeat them regularly, keeping in mind everything covered in this lesson.
Everything you learn through these exercises will be applied in nearly every drawing you create and will become part of your fundamental skill set, used in both the simplest sketches and more complex works.
Straight Lines
This exercise helps develop your ability to draw clean, straight lines and build muscle memory. Fill an entire page with parallel lines, drawing each one in a single, continuous motion. Focus on keeping the lines straight, avoiding corrections, and maintaining consistent spacing and direction.

Point-to-Point Lines
This exercise is similar to the previous one but focuses more on accuracy and control when working toward a specific target. Place a series of points on the page and connect them with clear, confident strokes. Each line should precisely connect two points without deviation.
Arrange the points both symmetrically and asymmetrically, and vary the distances between them. This will train your ability to control direction and length under different conditions.

Line Repetition
This exercise trains consistency and control. First, draw a line of a specific length and shape. Then repeat it several times, placing each new line at the same distance from the previous one and keeping the same direction and proportion.
In addition, this exercise also helps improve basic hatching control, as it develops the ability to maintain equal spacing and rhythm between lines.

Pressure Control
This exercise trains your ability to control line weight. Draw lines while gradually increasing and decreasing pressure, creating smooth transitions from light to dark and back again. The change in tone should be controlled and even, without abrupt shifts.

Even Hatching
This exercise develops the basic skill of hatching and the ability to create even tonal areas. Draw a rectangle and fill it with uniform, one-directional hatching.
Each stroke should be applied separately, with equal spacing between them. Keep the direction consistent and avoid random or uneven movements. The tone across the entire area should appear even.

Gradation from Dark to Light
Now draw an elongated rectangle and fill it with hatching that gradually transitions from very dark to very light. Start with dense, dark hatching, applying strokes evenly and at the same distance from each other.
As you move toward the opposite end, gradually lighten the strokes by reducing pressure on the pencil, while maintaining the same direction and spacing between them.

Form Hatching
This exercise helps you learn to see and emphasize form using hatching. Draw simple geometric shapes such as a cube, sphere, cylinder, or prism. Apply hatching that follows the form of each object. Use straight strokes on flat surfaces and curved strokes on rounded forms.


